Saturday, December 17, 2011

Chocolate-Dipped Marshmallows {8th 12 Days Recipe}

Looking for a super easy Christmas treat to gift friends and family?  How about one that's super easy, while also being simultaneously festive and unique?  Then try Good Housekeeping's red, white and chocolate Hot Chocolate Dippers!  {Hints:  chocolate chips melt easier than block chocolate, red sprinkles can be used instead of red nonpariels, and candy canes with the curved edge broken off can be used if red-and-white straws can't be found}.


 Hot Chocolate Dippers

Ingredients
Large marshmallows
Chocolate
Red nonpareil sprinkles 
Drinking straws

Skewer marshmallows on straws, then melt chocolate in a small vessel (such as a shallow microwave-safe bowl). Dip in marshmallows, leaving white tops exposed; lift sticks straight up, letting excess chocolate drip off. Cool briefly on waxed paper, but dip marshmallow bottoms into sprinkles while chocolate is still slightly soft.

Place several dipped marshmallows in a festive treat bag {like the ones available from Wilton} and secure with a red ribbon, or display on a holiday plate for serving.


xoxo
Bean
{photo courtesy:  goodhousekeeping.com}


Astrological Sign T's {On Sale Now!}


I was Christmas shopping for my brothers yesterday when I wound up in Charlotte Russe {I'm not sure why I thought I would find something for my brothers there ~ but I did find two great pairs of sparkly high heels!}.  I wasn't really looking through the clothing racks thoroughly, but I happened across these super-adorable zodiac sign Ts.  The front features the symbol and word for each sign, and the back has three words that describe that sign.

The best part?  Online, these shirts are on sale for $10!  {They may be $10 in-store too ~ call your local Charlotte Russe to check}. They come in sizes S/M and M/L and have every astrological sign available.  The model pictured is 5'11" and wearing a M/L {I love when sites include that info}, so as you can see they're definitely more of a juniors-type sizing and a M/L would probably fit up to a size 12 comfortably, but size 14+ girls {like me!} may find it a bit too snug.

At $10, these shirts can fit just about any budget, and would be a great birthday {or Christmas} idea for the teen {or fairly slender adult} in your life.  I love reading about astrology and the characteristics of different signs, so if they ever release this shirt in a L/XL, I'll be the first to snag one!

Click below for a direct link to each astrological sign T:

Capricorn T
Aquarius T
Pisces T
Aries T
Taurus T
Gemini T
Cancer T
Leo T
Virgo T
Libra T
Scorpio T
Sagittarius T


xoxo
Bean

Friday, December 16, 2011

Britney Spears is Engaged!


One of my fave girls {whom I've never met}, Miss Britney Spears, is engaged to former agent and longtime boyfriend Jason Trawick, People and Us Weekly are reporting.  Friday morning, Britney tweeted a hint of the engagement...


Britney Spears
OMG. Last night Jason surprised me with the one gift I've been waiting for. Can't wait to show you! SO SO SO excited!!!! Xxo
 
 
The proposal reportedly took place during a private birthday dinner for Jason last night, and my girl Britney is said to now having a dazzling Neil Lane rock on her ring finger.
 
Click here to read People's write-up on the early engagement news, and here to read Us Weekly's account.

Glad to see Britney happy and doing well.  Congratulations, girl!

xoxo
Bean

{photo credit:  people.com}

Mint-Chocolate Brownies {7th 12 Days Recipe}


Chocolate and mint ~ what a great winter flavor combo!  Impress your friends with these from scratch Martha Stewart brownies, complete with a cool and refreshing mint center!


Mint-Chocolate Brownies
Ingredients
  • 8 tablespoons (1 stick) unsalted butter, plus more for pan
  • 8 ounces semisweet or bittersweet chocolate, chopped
  • 1 cup sugar
  • 3/4 teaspoon salt
  • 3 large eggs
  • 1/2 cup all-purpose flour, (spooned and leveled)
  • 1/4 cup unsweetened cocoa powder
  • 25 small (1 1/2 inch) peppermint patties

Directions
  1. Preheat oven to 350 degrees. Line an 8-inch square baking pan with aluminum foil, leaving an overhang on all sides; butter foil. Set aside.
  2. Place chocolate and butter in a medium heatproof bowl set over (not in) a saucepan of gently simmering water. Stir occasionally just until melted, 4 to 5 minutes.
  3. Remove from heat. Whisk in sugar and salt until smooth; whisk in eggs. Gently whisk in flour and cocoa powder just until smooth (do not overmix).
  4. Spread 1/3 of batter in prepared pan. Arrange peppermint patties on batter in a single layer, leaving a narrow border on all sides. Top with remaining batter, and smooth surface. Bake until a toothpick inserted in center comes out with moist crumbs attached, 45 to 55 minutes.
  5. Cool completely in pan. Use foil to lift from pan; peel off foil and discard. Cut into 16 squares (4 rows by 4 rows).

xoxo
Bean

{photo credit:  marthastewart.com}

Adorable Aprons!

Still looking for that perfect gift for your mom, sister, best friend ~ even daughter or niece?  Jessie Steele aprons make the perfect gift for the girl in your life who likes to cook, bake, hostess...or just look cute in the kitchen!


In polka-dots, paisleys, florals, and more, there are a variety of styles and patterns to choose from.  Some are classic, some are sassy ~ but all are adorable!  They're one size fits all and for the most part are around $30.  Many are in the classic tie-at-the-waist, fit-and-flare style, but some {like the peacock print above} tie under the bust in an empire-waist. 

Some of the prints are available in children's sizes for around $20.  There is a "Sale" tab as well, and some aprons come with matching accessories like dishtowels and oven mitts {like the sailor-themed set below}.

Jessie Steele also offers salon aprons, pajamas, and robes, but they're mostly known for their cute hostess aprons, like the ones pictured here.  I bought myself the Cherry Cupcake apron at Anthropologie several years ago, and I got such a kick out seeing Charlotte wear it in one of the Sex and the City movies after the fact!


Super cute, right?  Hope you're finishing up your holiday shopping with ease!

xoxo
Bean

{photo credits:  all photos jessiesteele.com}

Thursday, December 15, 2011

Make Your Own Rings {Great Gift Idea!}

When I saw this post about making homemade rings out out buttons on FamilyCircle.com, I knew I had to share it for all my crafty readers out there.  These unique rings {no two are the same!} would make a great handmade holiday gift, or you could make your own custom statement pieces to wow friends and family with!


What you need:
Buttons with a metal shank {she found hers at a local shop that carries decorative vintage and new buttons; she also suggests finding buttons on Etsy}
Wire cutters or tin snips
Adjustable ring blanks {find at craft stores like Michael's}
Jewelry glue or other heavy duty adhesive

How to:
1. Snip the metal shank from the buttons, getting as close to the base as possible.
2. Apply glue to the surface of the ring blank and attach to the back of the button.
3. Set it face down to dry and cure for 24 hours (see glue label for when total adhesion and curing occurs).

Tip:
If you have a ring that’s difficult to dry face down, make a small ring of aluminum foil and rest the ring inside to support it while it dries.


Happy crafting!
xoxo
Bean

{photo credit:  familycircle.com}

Cake Balls and Cake Pops {6th 12 Days Recipe}


By now I'm sure you've heard of cake balls or cake pops.  They've become all the rage in the past year, and with good reason ~ they're adorable and delish.  Bakerella didn't invent cake balls and pops, but she did help them bring them into the mainstream last winter through her blog and her book.  Last January Starbucks added cake pops to their bakery selections, and I was so glad that I had introduced my friends and family to them ahead of the curve in my Christmas baskets.


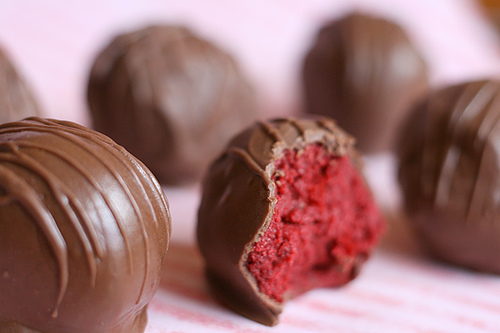
I haven't made any cake balls or pops yet this season, so I used Bakerella's pictures for this post.  I've made both red velvet and Funfetti cake balls in the past, with both white and chocolate coatings.  All are super yummy, but the red velvet with chocolate coating are probably my favorite.

Below are Bakerella's instructions for cake balls.  To go the cake pop route instead,  use lollipop sticks from the craft store.  Dip one end of the stick into your melted chocolate and then insert into the cake ball before coating the ball {so the stick "glues" itself to the inside of the ball}.  I then stick the lollipop sticks in a Styrofoam block to cool and set without losing their shape.  For the themed cake pops pictured above, follow the links at the bottom of the post.

You can substitute any flavor cake mix for the red velvet, although the red color is perfect for Christmastime.  I also use plain white frosting instead of cream cheese in mine for the lactose-intolerant people in my life, and I've found that Candy Melts {you can find them at Michael's in the baking section} work great in place of chocolate bark.


Red Velvet Cake Balls

Ingredients
1 box red velvet cake mix {cook as directed on box for 13 X 9 cake}
1 can cream cheese frosting {16 oz.}
1 package chocolate bark (regular or white chocolate)
wax paper


After cake is cooked and cooled completely, crumble into large bowl. Mix thoroughly with 1 can cream cheese frosting {using your hands will make it easier to mix}.  Roll mixture into quarter size balls and lay on cookie sheet. {Should make 45-50. You can get even more if you use a mini ice cream scooper}. Chill for several hours. {You can speed this up by putting in the freezer}.

Melt chocolate in microwave per directions on package.  Roll balls in chocolate and lay on wax paper until firm. {Use a spoon to dip and roll in chocolate and then tap off extra}.

***Only melt a few pieces of chocolate bark {or a small amount of candy melts} at a time because it starts to cool and thicken. It’s easier to work with when it’s hot.


For the Christmas Tree, Reindeer and Santa Hat cake pop instructions, click here.

For the Snowmen cake pop instructions, click here.


xoxo
Bean

{photo credit:  all photos bakerella.com}