Showing posts with label 12 Days of Christmas {Treats}. Show all posts

Thursday, December 22, 2011

Red Velvet Whoopie Pies with Peppermint Filling {12th 12 Days Recipe}


When I buy special-edition holiday baking magazines, I hang onto them and store them with the rest of my cookbooks.  They're chock-full of great, timeless recipes that I can tap into year after year ~ everything from cookies and bars to cakes and pies, from appetizers and side dishes to cocktails.  I made a few batches of classic chocolate whoopie pies a few years ago, and they were a hit.  This year, I decided to try out a red velvet whoopie pie recipe from the same 2009 Better Homes and Gardens "Christmas Cookies" publication.  The pretty red-and-white color combo looks perfect on a Christmas dessert table, and whipped up with a peppermint filling, they're sure to be a favorite!

Red velvet cake traditionally pairs with a cream cheese frosting, and BH&G suggested a cream cheese and peppermint filling to give these cakes a holiday kick.  I added mint extract to a traditional white filling instead {skipping the cream cheese} to accommodate the lactose-intolerant people in my life {yes, I know it still has milk and butter.  My brother can have milk if it's cooked and butter in small doses.  If you have someone who is completely lactose-intolerant in your life, you may want to opt for a canned vanilla frosting mixed with a teaspoon of mint extract}.  For those red-velvet-and-cream-cheese purists {I hear ya!}, I've included the suggested cream cheese filling recipe here as well.


As you can see, the magazine topped their whoopie pies with crushed peppermints.  I crushed a few candy canes up and rolled the sides of a finished whoopie pie through it, but I decided I liked the way they looked plain better.  If you'd like to add crushed peppermints or candy canes to your whoopie pies, sprinkle some on top right before serving.


Red Velvet Whoopie Pies
with Peppermint Filling

Ingredients {Whoopie Pies}
1/2  cup butter, softened
1     cup packed brown sugar
2     Tbsp unsweetened cocoa powder
1/2  tsp baking soda
1/4  tsp salt
1     egg
1     tsp vanilla
2     cups all-purpose flour
1/2  cup buttermilk
1     1-oz bottle red food coloring {2 Tbsp}

1.  Preheat oven to 375 degrees F.  Line a cookie sheet with parchment paper; set aside.  In a large bowl, beat the butter with an electric mixer on medium to high speed for 30 seconds.  Add the brown sugar, cocoa powder, baking soda and salt.  Beat until combined, scraping the bowl occasionally.  Beat in egg and vanilla until combined.  Alternately add flour and buttermilk, beating on low speed after each addition just until combined.  Stir in red food coloring.

2.  Spoon dough from a rounded measuring teaspoon 2 inches apart onto prepared cookie sheet.  {Keep mounds as rounded as possible}.  Bake in the preheated oven for 7 to 9 minutes or until edges are set.  Cool on cookie sheet for 2 minutes.  Transfer cookies to a wire rack; let cool.

3.  Spread filling on flat sides of half of the cookies.  Top with remaining cookies, flat sides down, pressing lightly together.  Serve immediately.

Makes about 40 sandwich cookies

To store:  Layer cookies between sheets of waxed paper in an airtight container; cover.  Store in the refrigerator for up to 3 days.  Let cookies stand at room temperature for 20-25 minutes before serving.


Ingredients {White Filling}
3/4  cup milk
1/4  cup all-purpose flour
3/4  cup butter, softened
2     cups powdered sugar
1/2  tsp vanilla extract
1/2  tsp peppermint extract

In a small saucepan, combine the milk and flour.  Cook and stir over medium heat until thickened and bubbly {note:  don't leave unattended.  This will thicken quickly and will scald and burn if not stirred constantly}.  Cook and stir 2 minutes more.  Remove from heat; cool.  In a large bowl, beat butter with an electric mixer on medium to high speed for 30 seconds.  Beat in powdered sugar until fluffy.  Beat in vanilla and peppermint extracts.  Beat cooled milk mixture, one large spoonful at a time, into butter mixture.  Beat on high for 1 minute or until filling is smooth and fluffy.


Ingredients {Cream Cheese Filling}
6   ounces cream cheese, softened
3   Tbsp butter, softened
1/2 tsp peppermint extract
3    cups powdered sugar
      Milk, as needed

In a large bowl, combine cream cheese, butter and peppermint extract.  Beat with an electric mixer on medium-low to medium speed until light and fluffy.  Gradually beat in 3 cups powdered sugar.  Add milk, 1 teaspoon at a time, to make a filling of spreading consistency.


Have a very Merry Christmas, everyone!

xoxo
Bean

Wednesday, December 21, 2011

Chocolate Peppermint Pinwheel Cookies {11th 12 Days Recipe}

These pretty swirled cookies pair that classic holiday combo, chocolate and mint, and the swirled design looks so impressive to guests, without creating too much work for you.  {Food Network's Alton Brown ranks them on the difficulty scale as "intermediate" ~ the trickiest part of the process is rolling out the doughs to the same size...not too tricky!}.  I made these cookies last Christmas and they were gobbled up fast.


Chocolate Peppermint Pinwheel Cookies

Ingredients
1 batch Sugar Cookies, recipe follows
3 ounces unsweetened chocolate, melted
1 teaspoon vanilla extract
1 egg yolk
1 teaspoon peppermint extract
1/2 cup crushed candy canes or peppermint candies

Divide the dough in half; add chocolate and vanilla to one half and incorporate with hands. Add egg yolk, peppermint extract, and crushed candy to other half of dough and incorporate with hands. Cover both with plastic and chill for approximately 5 minutes. Roll out doughs separately to approximately 1/4-inch thickness. Place peppermint dough on top of chocolate and press together around the edges. Using waxed paper or flexible cutting board underneath, roll dough into log. Wrap in waxed paper and refrigerate for 2 hours. 
 

Preheat oven to 375 degrees F.


Remove dough from the refrigerator and cut into 1/2-inch slices. Place cookies 1-inch apart on greased baking sheet, parchment, or silicone baking mat and bake for 12 to 13 minutes, rotating the pan halfway through cooking time. Remove from oven and let sit on baking sheet for 2 minutes, then move to a wire rack to cool completely. Store in an airtight container for up to 1 week.


Sugar Cookies
3 cups all-purpose flour
3/4 teaspoon baking powder
1/4 teaspoon salt
1 cup unsalted butter, softened
1 cup sugar
1 egg, beaten
1 tablespoon milk
Powdered sugar, for rolling out dough


Sift together flour, baking powder, and salt. Set aside. Place butter and sugar in large bowl of electric stand mixer and beat until light in color. Add egg and milk and beat to combine. Put mixer on low speed, gradually add flour, and beat until mixture pulls away from the side of the bowl.  Follow directions above.

Yields approx. 3 dozen cookies


xoxo
Bean

Monday, December 19, 2011

Chocolate-Dipped Grahams {10th 12 Days Recipe}


I started working on this post because I had a serious craving for s'mores, with several obstacles in my way.  It's not really s'mores season, for one; also, I live in an apartment with no yard, so I don't have the grill or firepit required for appropriate s'mores-making.  {And don't try to make them in the microwave ~ the marshmallow will expand enormously, if not explode, and then become chewy and tough...I speak from experience}.

I set out to make an indoor s'mores-style treat, and one that could be packaged up in gift bags would be even better!  I started with marshmallow sauce {the ice cream topping kind}, because I figured Marshmallow Fluff would be too thick and more likely to make the graham crackers break {it doesn't spread incredibly easily}.  Coating the grahams in marshmallow sauce just made them soggy, though, and dipping them in chocolate first and then drizzling them with marshmallow sauce was a good alternative, but the marshmallow sauce took days to set, so they weren't easy to pack up for storage or gifting.

I finally admitted defeat and decided to just stick with a chocolate-dipped option with Christmas-colored sprinkles on top ~ simple, yummy, and decidedly less frustrating.  A handful of ingredients is all you need, and the chocolate hardens up super fast, making these a quick and easy last-minute dessert option.  {Read all the way to the bottom to see how I finally mastered the s'mores-style graham last night!}


 Graham crackers, chocolate, and sugar sprinkles ~ simple!


My husband pitched in to help while I took pictures of the dip/swirl/smooth process
~ those are not my hairy hands! ;)


 Let the dipped grahams set and harden for a bit 


All finished and ready for snacking!


Chocolate-Dipped Grahams

Ingredients
Honey graham crackers, broken into smallest rectangles
Semi-sweet chocolate chips
Toppings:  sprinkles; nonpareils;  crushed candy canes; for drizzling:  marshmallow sauce, melted peanut butter, melted colored candy melts

Line a cookie sheet with wax paper.  Break graham crackers along perforations into small rectangles  {the bigger the cracker, the more likely it will break during the dipping process, so the smallest option is the best}.

Melt chocolate chips in the microwave or in a double-boiler, stirring frequently and taking care not to let chocolate burn.  {I use the microwave and use 1/3 - 1/2 a bag, and melt more as needed}.  Holding one end of the cracker, drag it through the chocolate on one side and then the other.  Use a spoon or spatula to wipe off excess chocolate and cover any missed spots.

Place dipped graham crackers on wax paper.  Dip and place 4-6 grahams, and then sprinkle with toppings {if using}, while chocolate is still very wet.  If you are using a drizzle topping, you can wait until you're finished dipping all your grahams.

Allow grahams to cool and harden before packaging or serving.


And for a chocolate-marshmallow treat....

 Spread Marshmallow Fluff on one side of a cracker


 Use spoon to help coat graham, leaving a little bit of fluff exposed


Ta-dah!

After a trial-and-error process, I mastered the s'mores-style dipped graham cracker yesterday!  Spread a bit of Marshmallow Fluff carefully on one side of a graham cracker piece ~ fluff on both sides will make the cracker soggy within an hour or so.  If you've ever made a peanut butter and fluff sandwich {and I've been told most people outside of Massachusetts don't even know what that is?}, you know that fluff is notorious for ripping apart the bread because of it's thick, super-sticky consistency.  Use a small amount of fluff and spread carefully, and you'll be fine.

Follow the same dipping process as above, but use a spoon or spatula even more to help coat the marshmallow side ~ otherwise each dip and swirl will leave more and more fluff behind in your bowl of chocolate.


Enjoy!

xoxo
Bean

Sunday, December 18, 2011

Chocolate-Peppermint Bark {9th 12 Days Recipe}


There are a lot of different ways to make a chocolate bark ~ with nuts, with fruit, with pretzels, with just about everything but the kitchen sink.  For Christmastime, though, nothing beats a bark that combines dark chocolate and peppermint.  The great thing about a bark is that it's supposed to look rustic and imperfect, so it's really hard to mess up.  It also comes together in a snap ~ you could throw it together a few hours before you need it without a problem.  And my version requires only three ingredients!

 White baking morsels, semi-sweet chocolate morsels, and candy canes ~ that's it!


Stir in crushed candy canes


 Spread mixture on a wax-paper-lined cookie sheet ~ it may not spread the full length of the pan


 Cover set white/peppermint layer with melted chocolate


 When bark is completely set, break into pieces and package or serve


Bean's Chocolate-Peppermint Bark

Ingredients
1 12-ounce bag semi-sweet chocolate chips
1 12-ounce bag white baking morsels
3 candy canes, crushed

Line a small cookie sheet with wax paper and set aside.

In a double boiler over a low to medium-low flame, melt white baking morsels, stirring frequently.  {Tip:  you don't need more than an inch or so of water in the bottom pan of the double boiler.  Water shouldn't touch the top pan or bubble over the sides}.  When morsels are melted and smooth, stir in 2 crushed candy canes.  

Immediately spread mixture across prepared cookie sheet.  It may not spread all the way to the edges.  Spread to your desired thickness in a rectangular shape and place sheet in the freezer for 20-25 minutes to set.

Clean and thoroughly dry top pan of double-boiler ~ any water inside the pan can cause the chocolate to "seize" up and become impossible to work with.  

Once pan is clean and dry and the white/peppermint layer is just about set, melt the semi-sweet chocolate in the double-boiler.  When melted and smooth, drop dollops of chocolate across the surface of solid white/peppermint layer and quickly smooth it out of the edges.  Immediately sprinkle remaining crushed candy cane across the surface and place back in the freezer for another 20-25 minutes to set.

When bark is completely hardened, remove from freezer.  Break into pieces and package or set out to serve.


xoxo
Bean

Saturday, December 17, 2011

Chocolate-Dipped Marshmallows {8th 12 Days Recipe}

Looking for a super easy Christmas treat to gift friends and family?  How about one that's super easy, while also being simultaneously festive and unique?  Then try Good Housekeeping's red, white and chocolate Hot Chocolate Dippers!  {Hints:  chocolate chips melt easier than block chocolate, red sprinkles can be used instead of red nonpariels, and candy canes with the curved edge broken off can be used if red-and-white straws can't be found}.


 Hot Chocolate Dippers

Ingredients
Large marshmallows
Chocolate
Red nonpareil sprinkles 
Drinking straws

Skewer marshmallows on straws, then melt chocolate in a small vessel (such as a shallow microwave-safe bowl). Dip in marshmallows, leaving white tops exposed; lift sticks straight up, letting excess chocolate drip off. Cool briefly on waxed paper, but dip marshmallow bottoms into sprinkles while chocolate is still slightly soft.

Place several dipped marshmallows in a festive treat bag {like the ones available from Wilton} and secure with a red ribbon, or display on a holiday plate for serving.


xoxo
Bean
{photo courtesy:  goodhousekeeping.com}


Friday, December 16, 2011

Mint-Chocolate Brownies {7th 12 Days Recipe}


Chocolate and mint ~ what a great winter flavor combo!  Impress your friends with these from scratch Martha Stewart brownies, complete with a cool and refreshing mint center!


Mint-Chocolate Brownies
Ingredients
  • 8 tablespoons (1 stick) unsalted butter, plus more for pan
  • 8 ounces semisweet or bittersweet chocolate, chopped
  • 1 cup sugar
  • 3/4 teaspoon salt
  • 3 large eggs
  • 1/2 cup all-purpose flour, (spooned and leveled)
  • 1/4 cup unsweetened cocoa powder
  • 25 small (1 1/2 inch) peppermint patties

Directions
  1. Preheat oven to 350 degrees. Line an 8-inch square baking pan with aluminum foil, leaving an overhang on all sides; butter foil. Set aside.
  2. Place chocolate and butter in a medium heatproof bowl set over (not in) a saucepan of gently simmering water. Stir occasionally just until melted, 4 to 5 minutes.
  3. Remove from heat. Whisk in sugar and salt until smooth; whisk in eggs. Gently whisk in flour and cocoa powder just until smooth (do not overmix).
  4. Spread 1/3 of batter in prepared pan. Arrange peppermint patties on batter in a single layer, leaving a narrow border on all sides. Top with remaining batter, and smooth surface. Bake until a toothpick inserted in center comes out with moist crumbs attached, 45 to 55 minutes.
  5. Cool completely in pan. Use foil to lift from pan; peel off foil and discard. Cut into 16 squares (4 rows by 4 rows).

xoxo
Bean

{photo credit:  marthastewart.com}

Thursday, December 15, 2011

Cake Balls and Cake Pops {6th 12 Days Recipe}


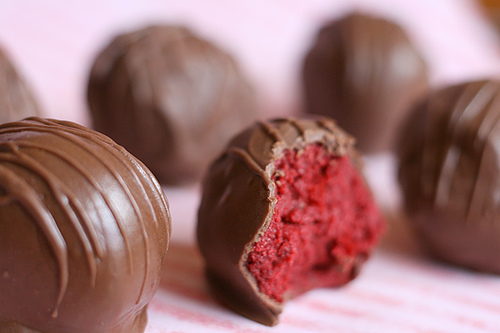
By now I'm sure you've heard of cake balls or cake pops.  They've become all the rage in the past year, and with good reason ~ they're adorable and delish.  Bakerella didn't invent cake balls and pops, but she did help them bring them into the mainstream last winter through her blog and her book.  Last January Starbucks added cake pops to their bakery selections, and I was so glad that I had introduced my friends and family to them ahead of the curve in my Christmas baskets.


I haven't made any cake balls or pops yet this season, so I used Bakerella's pictures for this post.  I've made both red velvet and Funfetti cake balls in the past, with both white and chocolate coatings.  All are super yummy, but the red velvet with chocolate coating are probably my favorite.

Below are Bakerella's instructions for cake balls.  To go the cake pop route instead,  use lollipop sticks from the craft store.  Dip one end of the stick into your melted chocolate and then insert into the cake ball before coating the ball {so the stick "glues" itself to the inside of the ball}.  I then stick the lollipop sticks in a Styrofoam block to cool and set without losing their shape.  For the themed cake pops pictured above, follow the links at the bottom of the post.

You can substitute any flavor cake mix for the red velvet, although the red color is perfect for Christmastime.  I also use plain white frosting instead of cream cheese in mine for the lactose-intolerant people in my life, and I've found that Candy Melts {you can find them at Michael's in the baking section} work great in place of chocolate bark.


Red Velvet Cake Balls

Ingredients
1 box red velvet cake mix {cook as directed on box for 13 X 9 cake}
1 can cream cheese frosting {16 oz.}
1 package chocolate bark (regular or white chocolate)
wax paper


After cake is cooked and cooled completely, crumble into large bowl. Mix thoroughly with 1 can cream cheese frosting {using your hands will make it easier to mix}.  Roll mixture into quarter size balls and lay on cookie sheet. {Should make 45-50. You can get even more if you use a mini ice cream scooper}. Chill for several hours. {You can speed this up by putting in the freezer}.

Melt chocolate in microwave per directions on package.  Roll balls in chocolate and lay on wax paper until firm. {Use a spoon to dip and roll in chocolate and then tap off extra}.

***Only melt a few pieces of chocolate bark {or a small amount of candy melts} at a time because it starts to cool and thicken. It’s easier to work with when it’s hot.


For the Christmas Tree, Reindeer and Santa Hat cake pop instructions, click here.

For the Snowmen cake pop instructions, click here.


xoxo
Bean

{photo credit:  all photos bakerella.com}

Wednesday, December 14, 2011

Hand-Dipped Oreos {5th 12 Days Recipe}


Here is the first of two easy-peasy no-bake recipes I tested out for you this weekend.  All you need for these super delicious cookie treats are two ingredients {plus toppings/decorations}, a microwave and microwave-safe bowl, and some wax paper.

I remember when fudge-covered Oreos hit shelves about ten years ago.  I thought I'd died and gone to heaven!  It occurred to me this year that I could easily {I hoped} whip up these treats for Christmas baskets and dessert buffets.  Classic Oreo cookies + a teeny bit of effort = yummy, simple treats that will please kids young and old.


 Your ingredient list ~ Oreos.  Chocolate Chips.  The End.
{Plus toppings ~ I went with red and green sugar sprinkles, and crushed candy canes}


 Dip your Oreos in melted chocolate.  Swirl, sweep, and roll the cookies to coat them.


 Sprinkle toppings on Oreos while the chocolate is still wet.


Place coated cookies on wax paper to set.


 Hand-Dipped Oreos ~ with sprinkles or with crushed candy canes


Hand-Dipped Oreos

Ingredients
Oreos {I picked Holiday Oreos, for the pretty, festive filling}
Semi-sweet chocolate chips
Toppings, if desired ~ crushed candy canes, sprinkles, melted candy melts or white chocolate to drizzle

Melt chocolate chips in a microwave safe bowl at 30-second intervals, stirring between intervals.    Once chocolate is melted and smooth, begin dipping by swirling or sweeping Oreos through the chocolate one at a time.  Roll Oreo around in chocolate to coat all sides and place on wax paper to set.  {Don't "dunk" or dip Oreos in chocolate and lift straight up ~ the weight of the chocolate may cause cookies to break}.

Dip four to six Oreos at a time in chocolate, and then sprinkle with toppings before chocolate begins to harden.  Allow cookies to set {30-40 minutes or until chocolate is hard to the touch} before packaging or plating.


Enjoy!

xoxo
Bean


Saturday, December 10, 2011

Mini-Chip Snowball Cookies {4th 12 Days Recipe}

Warning:  these.  are.  addictive!  These bite-sized little chocolate chip-studded treats are simply delicious, and they're the perfect size for packaging up for gifts.  They have an almost shortbread-like taste and texture, and are egg-free {great for vegans ~ using vegan-friendly carob chips? ~ and those with egg allergies}.  With a half-dozen ingredients, this recipe is simple to make and super easy to eat!

This recipe is also from the Cookie Bible cookbook I told you about when I posted the Chocolate Crackletop Cookies recipe.


Mini-Chip Snowball Cookies
Ingredients
1 1/2 cups {3 sticks} butter or margarine, softened
3/4 cup powdered sugar
1 Tbsp vanilla extract
1/2 tsp salt
3 cups all-purpose flour
2 cups {12-oz pkge} Nestle Tollhouse semi-sweet chocolate mini morsels
Powdered sugar

Preheat oven to 375 degrees F.

Beat butter, sugar, vanilla extract and salt in a large mixing bowl until creamy.  Gradually beat in flour; stir in morsels.  Shape level tablespoons of dough into 1 1/4 inch balls.  Place on ungreased baking sheets.

Bake for 10 to 12 minutes or until cookies are set and lightly browned.  Remove from oven.  Sift powdered sugar over hot cookies on baking sheets.  Cool on baking sheets for 10 minutes; remove to wire racks to cool completely.  Sprinkle with additional powdered sugar, if desired.  Store in airtight containers.

Makes about 5 dozen cookies.


xoxo
Bean


Friday, December 9, 2011

Reindeer Cookies {3rd 12 Days Recipe}

As if the fact that these cookies are flat-out adorable wasn't enough of a selling point...you use pre-made refrigerated cookie dough, so there are four {count them ~ four!} ingredients total!  Plus, no mixers, beaters, or spatulas needed, so clean-up is a breeze!  Thanks, Pillsbury!  {Find the link to another reindeer recipe from them at the bottom of this post}.


Reindeer Cookies

Ingredients
1 roll {16.5 oz} Pillsbury refrigerated gingerbread or peanut butter cookies 
64 small pretzel twists
64 semisweet chocolate chips
16 candied cherries or gumdrops, cut in half {or 32 M&Ms}

Heat the oven to 350 degrees F.  With hands, shape roll of cookie dough into triangle-shaped log.  {If dough is too soft to cut, place in freezer 30 minutes}.

With thin, sharp knife, cut dough into 32 {1/4-inch thick} triangular slices; on ungreased cookie sheets, place 2 inches apart.  Place 2 pretzel twists on each triangle near corners for antlers.

Bake 7 to 11 minutes, or until set.  While warm, lightly press 2 chocolate chips into each cookie for eyes, and 1 cherry half {or gum drop/M&M} for nose.  Remove from cookie sheets.  Let stand until chocolate chips are set, about 15 minutes.  Store between sheets of waxed paper in a tightly covered container.


Check out this frosted sugar-cookie version, also from Pillsbury ~ takes just a bit more elbow grease, but they're equally adorable.


xoxo
Bean